This article will discuss the principles and theory behind the pH measurement and relate these to the actual pH measurement done in the field and laboratory.
Introduction
Since the Danish chemist S.P.L. Sorensen defined pH in 1909, it has experienced an enormous development of the theory and practical application of the concept. Today, pH value is an important determining factor in a majority of chemical processes. In addition, the pH meter is one of the most popular analytical laboratory instrument. Measurement of pH by means of electronic instrumentation and electrodes holds a key position in the modern laboratory.
Reliable pH measurement requires more than a well-functioning pH meter. Selection of electrodes should be in accordance with the actual sample(s). Also, it should be in proper working condition; that is, they should be fast and reproducible. Furthermore, the calibration buffers and the calibration procedure are cornerstones for obtaining accurate results. The buffers should be precision solutions without contamination ( CO2 or microbiological ), and the calibration procedure should be correct.
Microprocessor-controlled pH meters simplify calibration and operation to quickly obtain pH measurements. Advanced instruments inform the operator about electrode failures or possible operator mistakes. The meter itself is able to check for a properly functioning electrode and correctly perform calibration procedures. A self-check program allows the pH meter to check itself for operational errors. Using NIST buffer solutions rounds out the necessary ingredients for proper and accurate pH measurement.
What is pH?
Initially, the term pH was as an abbreviation of “pondus hydrogenii” to express very small concentrations of hydrogen ions.
The original definition of pH, is the negative base 10 logarithm of the hydrogen ion concentration.
![\[ pH= -\log_{10}\left [ H^{+} \right ] \]](https://alpha-measure.com/wp-content/ql-cache/quicklatex.com-e2678fb060ec0874d76bce38e43dd8fd_l3.png "Rendered by QuickLaTeX.com")
However, since hydrogen ion activity govern most chemical and biological reactions, the definition is now:
![\[ pH=-\log_{10}a_{H+} \]](https://alpha-measure.com/wp-content/ql-cache/quicklatex.com-90f618914f238a809573e6d18e426a03_l3.png "Rendered by QuickLaTeX.com")
The operational pH definition is on the basis of a standard hydrogen electrode setup. Also, it depends on standard buffers in accordance with IUPAC recommendation. This closely relates to the pH definition using the hydrogen ion activity.
In any collection of water molecules, a small number of water molecules will dissociate to form [H+] and [OH–] ions:
![\[ H_{2}O=H^{+}+OH^{-} \]](https://alpha-measure.com/wp-content/ql-cache/quicklatex.com-4d42fde15663a02c0cd6dd70c36f1ec7_l3.png "Rendered by QuickLaTeX.com")
At 25°C (standard temperature), pure water contains 1×10⁻⁷ moles per liter of hydrogen ions and 1×10⁻⁷ moles per liter of hydroxide ions.
In any aqueous solution, the concentration of hydrogen ions multiplied by the concentration of hydroxide ions is constant. Thus, allowing us to define the dissociation constant for water, Kw:
![\[ K_{W}=[H^{+}][OH^{-}]=10^{-14} \]](https://alpha-measure.com/wp-content/ql-cache/quicklatex.com-1ac664767169171c2268384369b1178c_l3.png "Rendered by QuickLaTeX.com")
Where the brackets signify molar concentrations.
The value of Kw (and therefore pH) is temperature dependent:
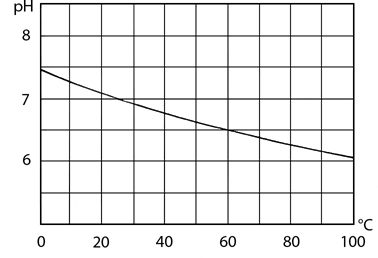
![\[ 0^{\circ}C\, pK_{W}=14.94pH=7.47 \]](https://alpha-measure.com/wp-content/ql-cache/quicklatex.com-00c45c90d13bcbc52a25cf6dce4f02b5_l3.png "Rendered by QuickLaTeX.com")
![\[ 18^{\circ}C\, pK_{W}=14.22pH=7.11 \]](https://alpha-measure.com/wp-content/ql-cache/quicklatex.com-060d9bcaf1e9bf6d0a5c36ecbd995b09_l3.png "Rendered by QuickLaTeX.com")
![\[ 25^{\circ}C\, pK_{W}=14.00pH=7.00 \]](https://alpha-measure.com/wp-content/ql-cache/quicklatex.com-fec35dd2824f82fa351b3710beb94cc6_l3.png "Rendered by QuickLaTeX.com")
![\[ 50^{\circ}C\, pK_{W}=13.22pH=6.61 \]](https://alpha-measure.com/wp-content/ql-cache/quicklatex.com-89f822e9d9d6a35848573f7132885198_l3.png "Rendered by QuickLaTeX.com")
![\[ 100^{\circ}C\, pK_{W}=12.24pH=6.12 \]](https://alpha-measure.com/wp-content/ql-cache/quicklatex.com-9373be3d261255a9b1f3c1df66e9d9dd_l3.png "Rendered by QuickLaTeX.com")
Acidity and Basicity on a pH Scale
The pH scale provides a convenient and standard method of quantifying the acidity or basicity of a particular solution. Its range is based on the dissociation constant of water, Kw, defined above.
Generally, most samples will have less than 1 Molar H+ or OH– concentrations. So, the extremes of the pH scale are set at pH 0 to pH 14. With strong acids or bases, values exist below pH 0 and above pH 14, but these rarely undergo measurement.
Dissolving acids and bases in water alters the relative amounts of H+ and OH– ions in solution. If an acid is dissolved in water, it increases the H+ ion concentration. Because the product [H+] [OH–] must remain constant, the OH– ion concentration must therefore decrease. While dissolving a base in water, results in the converse happening.
Thus, pH can also be viewed as a simultaneous measurement of both acidity and basicity. Because, by knowing the concentration of either the H+ or the OH– ion, one can determine the other.
pH as a Logarithmic Function
Also, pH is a logarithmic function. A change in one pH unit is equal to a ten-fold change in H+ ion concentration. Table one illustrates the relationship between the H+ and OH– ions at different pH values.
| pH | [H+] | [OH–] |
| 0 | (100) 1 | 0.00000000000001 (10-14) |
| 1 | (10-1) 0.1 | 0.0000000000001 (10-13) |
| 2 | (10-2) 0.01 | 0.000000000001 (10-12) |
| 3 | (10-3) 0.001 | 0.00000000001 (10-11) |
| 4 | (10-4) 0.0001 | 0.0000000001 (10-10) |
| 5 | (10-5) 0.00001 | 0.000000001 (10-9) |
| 6 | (10-6) 0.000001 | 0.00000001 (10-8) |
| 7 | (10-7) 0.0000001 | 0.0000001 (10-7) |
| 8 | (10-8) 0.00000001 | 0.000001 (10-6) |
| 9 | (10-9) 0.000000001 | 0.00001 (10-5) |
| 10 | (10-10) 0.0000000001 | 0.0001 (10-4) |
| 11 | (10-11) 0.00000000001 | 0.001 (10-3) |
| 12 | (10-12) 0.000000000001 | 0.01 (10-2) |
| 13 | (10-13) 0.0000000000001 | 0.1 (10-1) |
| 14 | (10-14) 0.00000000000001 | 1 (100) |
Nernst’s Law
The principle of the potentiometric pH measurement is rooted in Nernst’s Law. Nernst found that a potential difference occurs after immersing a metal object into a solution containing ions of the same metal. Nernst defined this potential difference, E, generated by the exchange of metal ions between the metal and liquid, as:
![\[ E=E_{0}+\left ( \frac{RT}{nF} \right )\ln \left [ M^{+} \right ] \]](https://alpha-measure.com/wp-content/ql-cache/quicklatex.com-218ae66a9c1c2a92f0581b6ccfcfe4f5_l3.png "Rendered by QuickLaTeX.com")
Where:
R is gas constant (R=8.314J/mole·K), F is Faraday number (F = 96493 C/mole), n is valency of the metal, [M+] is metal ion concentration, T is absolute temperature in Kelvin, and E0 is normal potential.
The “normal potential” is the potential difference arising between the metal and solution when the solution contains 1 mole M+/liter. Because the hydrogen ion has similar properties to metal ions (both have a positive charge).
Nernst’s law can also be applied to a “Hydrogen Electrode” immersed into a solution containing hydrogen ions. Nernst’s original equation can be rewritten as:
![\[ E=E_{0}+\left ( \frac{RT}{nF} \right )\ln \left [ H^{+} \right ] \]](https://alpha-measure.com/wp-content/ql-cache/quicklatex.com-b0e55b7d076b08cf2e5fd4e0c005dc9e_l3.png "Rendered by QuickLaTeX.com")
By definition, the normal potential, E, of the metal “hydrogen” in a 1 normal H+ solution is 0 volt at all temperatures. So, we can rewrite the formula as:
![\[ E=\left ( \frac{RT}{F} \right )\ln \left [ H^{+} \right ] \]](https://alpha-measure.com/wp-content/ql-cache/quicklatex.com-1ee892e5a5d86b1ca16521c8134ef77c_l3.png "Rendered by QuickLaTeX.com")
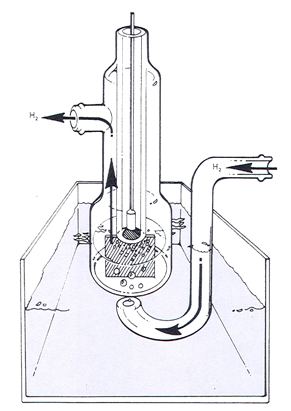
A “Hydrogen Electrode” can be made by coating a platinum electrode with a layer of platinum-black and passing a flow of hydrogen gas over it. The platinum-black coating allows the adsorption of hydrogen gas onto the electrode, resulting in a “Hydrogen Electrode”.
pH Generation by Glass
In 1906, Max Cremer discovered that potential difference generation by some types of glass depends on the acidic value of the liquid it is put in. With Fritz Haber, they proved that this potential difference, within a fixed pH range, follows Nernst’s law like the “Hydrogen Electrode”. They discovered that the formation of the “gel-layer” or “hydration-layer” makes their glass sensors sensitive to changes in pH levels.
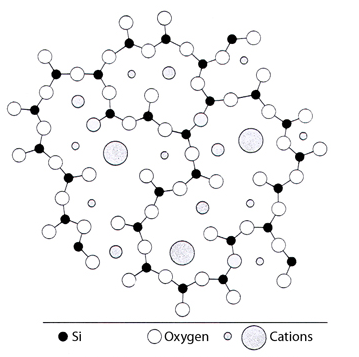
As shown in figure 3, the structure of pH glass is a network of oxygen atoms held together in irregular chains by silicon atoms. Each silicon atom is associated with four oxygen atoms, and each oxygen is shared by two SiO4 groups to form a three-dimensional network. The “holes” in this three-dimensional network are occupied by cations (the particular metal cations and their concentrations are typically proprietary formulas), held in place more or less strongly by the electrostatic field of neighboring oxygen ions. When immersed in an aqueous solution, the surface layers of the pH glass undergo an ion-exchange process, whereby alkali metal ions from the glass go into solution and are replaced by hydrogen ions. This results in both the development of an electrical potential and the buildup of a thin layer containing numerous hydroxyl groups:
![\[ Si-ONa+H_{2}O\rightarrow Si-OH+Na^{+}+OH^{-} \]](https://alpha-measure.com/wp-content/ql-cache/quicklatex.com-5a6f1524b8cc0403f2d5886b0845992a_l3.png "Rendered by QuickLaTeX.com")
on the surface of the glass membrane. This “gel-layer” or “hydration layer” is the equivalent of the metal in Nernst’s theory and is essential for the proper functioning of the pH glass electrode. The formation of this gel-layer continues until the ion exchange equilibria is reached and the electrochemical potential remains constant.
After reaching equilibrium, the hydrogen ion concentration/activity outside the glass and inside the gel-layer are equal. Thus, no further transport of hydrogen ions occurs. The voltage across the glass membrane is now zero. If the hydrogen ion concentration outside the glass and inside the gel-layer differs from the hydrogen ion concentration in the solution being measured, a transport of hydrogen ions takes place. This movement of ions affects the neutrality of the gel-layer. Consequently, a voltage will develop to prevent further transport of hydrogen ions. The value of this voltage is dependent upon the hydrogen ion concentration in the solution being measured. Because direct measurement of this voltage is impossible, adding a pH independent reference potential to the measuring circuit is necessary. The addition of this reference potential allows us to measure the potenital differences that arise across the glass membrane.
The Electrode Chain
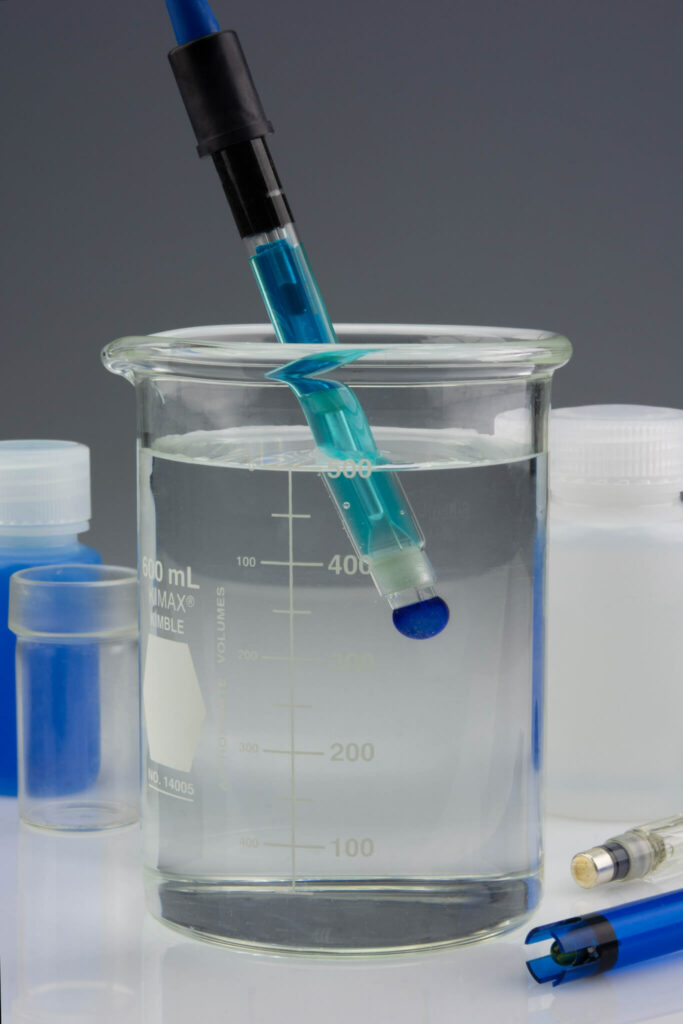
Two electrodes, the pH indicator electrode and the reference electrode, comprise the setup for measuring pH. For convenience a combination electrode including the indicator and the reference electrodes are built into a single body.
A small galvanic cell emerges on immersion of the two electrodes in a solution. The total potential developed is dependent on both electrodes, and is a sum total of several individual potentials. See the diagram below for an explanation of these various potential sources.
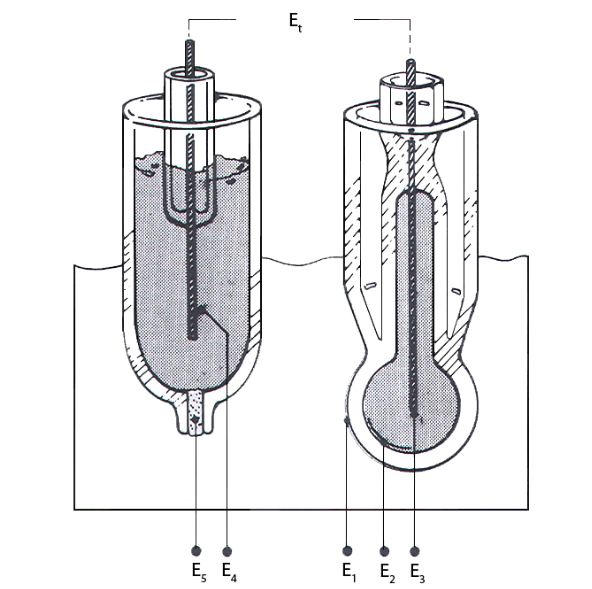
In Figure 4, E1 is the potential difference between the pH glass membrane and the sample being measured. E2 is the potential difference between the electrolyte in the glass electrode and the inner surface of the glass membrane. While E3 and E4 are the potential difference between the electrode pin and the electrolyte in the glass electrode, and the potential difference between the electrode pin and the electrolyte in the reference electrode respectively. E5 is potential difference that occurs at the reference junction (the interface which joins the reference electrolyte solution with the sample solution).
The expression for the sum total of these potential differences, Et, is:
![\[ E_{t}=E_{1}+E_{2}+E_{3}+E_{4}+E_{5} \]](https://alpha-measure.com/wp-content/ql-cache/quicklatex.com-0e12550fb0c732df1744d8d8871b4730_l3.png "Rendered by QuickLaTeX.com")
The main interest is only E1 (the potential difference between the pH glass membrane and the sample). So, it is necessary to compensate for the remaining potentials in a way that negates their effect on the true pH measurement. Let us re-examine these potentials:
If the potential difference between the electrolytes and electrode pins in both the pH glass electrode and the reference electrode (respectively) are identical and at the same temperature, the potentials generated by each will be equal but opposite: E3 = -E4, thereby negating each other. We can therefore simplify our equation:
![\[ E_{t}=E_{1}+E_{2}+E_{5} \]](https://alpha-measure.com/wp-content/ql-cache/quicklatex.com-184fb8928200e7640ce09b4a0ef8608e_l3.png "Rendered by QuickLaTeX.com")
With an appropriate selection of reference electrolyte and adequate flowrate through the reference junction, it is possible to neglect the potential difference, E5, so that
![\[ E_{t}=E_{1}+E_{2} \]](https://alpha-measure.com/wp-content/ql-cache/quicklatex.com-5c718db32e2b474cb86737935b442cfe_l3.png "Rendered by QuickLaTeX.com")
Because E1 and E2 are of opposite polarities in the pH measuring loop, our equation becomes:
![\[ E_{t}=E_{2}-E_{1} \]](https://alpha-measure.com/wp-content/ql-cache/quicklatex.com-31a9c8d25ef880ba878b72986e62ed61_l3.png "Rendered by QuickLaTeX.com")
Keep the potential difference E2 constant by filling the glass pH electrode with an electrolyte having excellent buffering properties. Leaving us with only E1 (the potential difference between the glass pH membrane and the sample).
Ideal conditions however, rarely exist in actual practice. For various reasons, a small potential difference can develop, and this potential difference is the asymmetry potential. Causes of asymmetry potential include:
- A reference junction potential (E5 not equal to 0).
- The inner and outer surfaces of the pH glass membrane may vary due to differences in glass texture which can occur during the bulb blowing process (E3 + E4 not equal to 0).
Fortunately, using appropriate buffer solutions during calibration can compensate for asymmetry potentials.
Only if the potential of the indicator electrode changes in response to varying pH while the potential of the reference electrode remains constant, do ideal measuring conditions exist.
The Nernst equation expresses the measured voltage, E in mV, as follows:
![\[ E=E_{ind}-E_{ref}=E{}'_{T}-\left ( R\cdot \frac{T}{F}\cdot \log a_{H^{+}} \right ) \]](https://alpha-measure.com/wp-content/ql-cache/quicklatex.com-2745c2a5d46b2899e2aca64da4775b32_l3.png "Rendered by QuickLaTeX.com")
Where
E ind = voltage of indicator electrode (mV)
E ref = voltage of reference electrode (mV)
E´T = temperature dependent constant (mV)
R = gas constant ( 8.3144 J/K )
T = absolute temperature ( K )
F = Faraday’s constant ( 96485.31 Coulombs )
The formula can be written
![\[ E=E{}'_{T}-\left ( 2.303\cdot R\cdot \frac{T}{F}\cdot \log a_{H^{+}} \right ) \]](https://alpha-measure.com/wp-content/ql-cache/quicklatex.com-0c346f113e2df40006e578caa9f9fe5f_l3.png "Rendered by QuickLaTeX.com")
By introducing the pH definition as pH = -log aH+, pH can be expressed at the temperature T as follows:
![\[ pH_{T}=pH_{T}^{\circ}-\left ( \frac{E}{R{}'} \cdot S\cdot T\right ) \]](https://alpha-measure.com/wp-content/ql-cache/quicklatex.com-426e18e94a02e77a46d624e4a6d03e71_l3.png "Rendered by QuickLaTeX.com")
where
R’ = constant = 0.1984 mV/K
S = sensitivity ( since the electrode response may differ from the theoretical response, a correction factor )
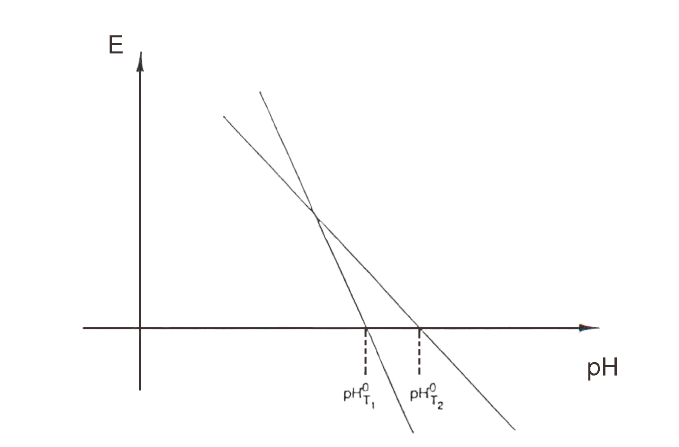
pH° = zero pH (the pH value at which the measured potential is zero; changes with temperature, producing another slope; see Figure 5)
Electrode Construction and Impact on pH
There are many ways to construct a glass indicator electrode and a reference electrode. Refer to the figure below for a typical representation of each.
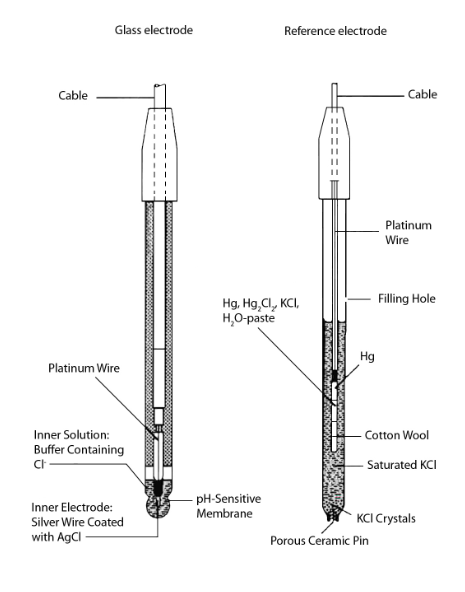
The potential for the glass electrode depends on the indicator electrode’s pH sensitive glass and the inner solution composition. The potential of the silver chloride coated silver wire, the inner electrode, depends on the inner solution chloride concentration. This potential will remain constant in each electrode.
Response of the electrode is the voltage between the inside and the outside of the glass membrane. It is proportional to the pH difference in the sample and in the inner solution. The ion exchange, controlled by the concentration of the H+ in both solutions, determines the electrode response caused by an exchange at both surfaces of the membrane between the ions of the glass and the H+ ions of the solution. In addition, because the glass membrane is rarely uniform, an asymmetry potential may develop. This occurs even if the pH is the same on both sides of the membrane.
The figure above shows a saturated calomel electrode, the reference electrode, consisting of a chamber containing mercury and calomel (Hg2Cl2) which are in contact with each other. A platinum wire is responsible for this contact between the mercury and the calomel. While a KCI-saturated solution surrounds the small internal chamber. A porous ceramic pin facilitates the contact between the saturated KCl and the measured solution. This interface is the liquid junction. The potential which occurs at this point is constant and the solubility product of the calomel and the concentration of the KCl solution determine its value.
The construction of a silver-silver chloride reference electrode is much the same way. Red glass should serve in the construction of the small internal chamber to prevent photochemical reactions from occurring due to exposure to light. A Ag/AgCl reference electrode is ideal for temperatures that vary from sample to sample and for high temperature measurement.
The potential of the reference electrode should not depend on the sample solution. Ideally, only K+ and Cl– ions are transported through the porous pin and move at the same speed. This occurs when the pH range of the samples is in the range of 1 to 13. Another scenario where this occurs is when using a saturated or 3M KCl internal filling solution. A liquid junction potential may occur if there is deviation from this optimal situation.
Liquid junction potentials in different samples obtained with saturated KCl as the internal filling solution are listed in Table 2. Dependence on sample composition and especially on pH is obvious by checking the liquid junction potentials.
| Sample | Liquid Junction Potential |
|---|---|
| 1M HCl | 14.1 mV |
| 0.1M HCl | 4.6 mV |
| 0.01M HCl | 3.0 mV |
| 0.1M KCl | 1.8 mV |
| pH 1.68 buffer | 3.3 mV |
| pH 4.01 buffer | 2.6 mV |
| pH 4.65 buffer | 3.1 mV |
| pH 7.00 buffer | 1.9 mV |
| pH 10.01 buffer | 1.8 mV |
| 0.01M NaOH | 2.3 mV |
| 0.1M NaOH | -0.4 mV |
| 1M NaOH | -8.6 mV |
Table 3 shows the equivalent conductivity in infinitely dilute solutions of the ions commonly used in internal filling solutions. The lowest liquid junction potential results from equal conductivity of the cation and anion, a measure to their mobility in solution.
| Cation | λ | Anion | λ |
|---|---|---|---|
| Li+ | 38.7 | CH3COO– | 40.9 |
| Na+ | 50.1 | ClO4– | 67.4 |
| K+ | 73.5 | NO3– | 71.5 |
| NH4+ | 73.6 | Cl– | 76.4 |
| Br– | 78.1 | ||
| 1/2 SO4-2 | 80.0 | ||
| H+ | 349.8 | OH– | 198.3 |
Types of electrodes
Glass Electrodes
Glass electrodes are available in many shapes and lengths to fit a wide variety of applications. Very thin electrodes for measurements in small diameter tubes, and spear point electrodes for measurements in meats and cheeses. Whereas flat membrane electrodes are common for surface measurements. The composition of the electrode membrane, as well as the shape, size, and type of inner electrode, can vary.
The pH sensitive glass composition will determine the electrode’s response time. It also influences its sensitivity to other ions as well as to H+. Sodium ion error or, to a lesser extent, lithium ion error, may enter the picture at pH values exceeding 11. This is normally called the sodium ion or alkaline error. A large concentration of sodium ions and a low concentration of hydrogen ions could cause the absorption of sodium ions to penetrate the surface layer of the glass membrane, resulting in a higher surface ion concentration. A lower pH value will result.
Glass electrodes have two disadvantages:
- Measuring solutions containing particulate can damage the glass membrane.
- Also, the glass membrane easily breaks.
There are alternatives to the glass membrane. Although their application is seldom due to other drawbacks, such as limited pH range or long response time. The antimony electrode serves as an alternative, mainly in solutions containing HF. A thin oxide layer formed on the surface of the antimony is sensitive to pH.
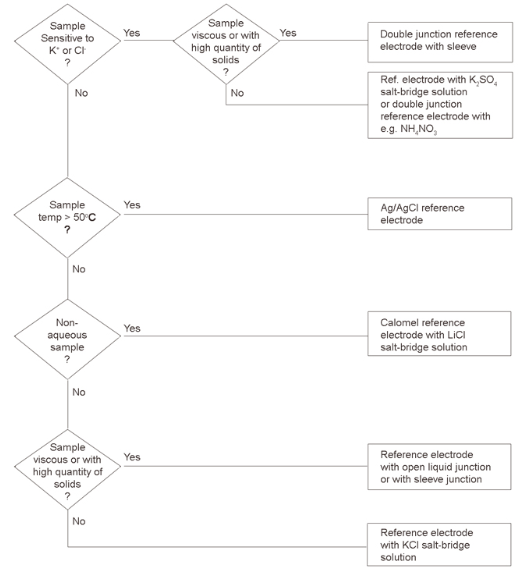
Reference Electrodes
A variety of reference electrodes are available. The correct type relates to
- The physical construction of the liquid junction.
- Composition of the internal filling solution.
- Also, the electrode’s electrochemical composition
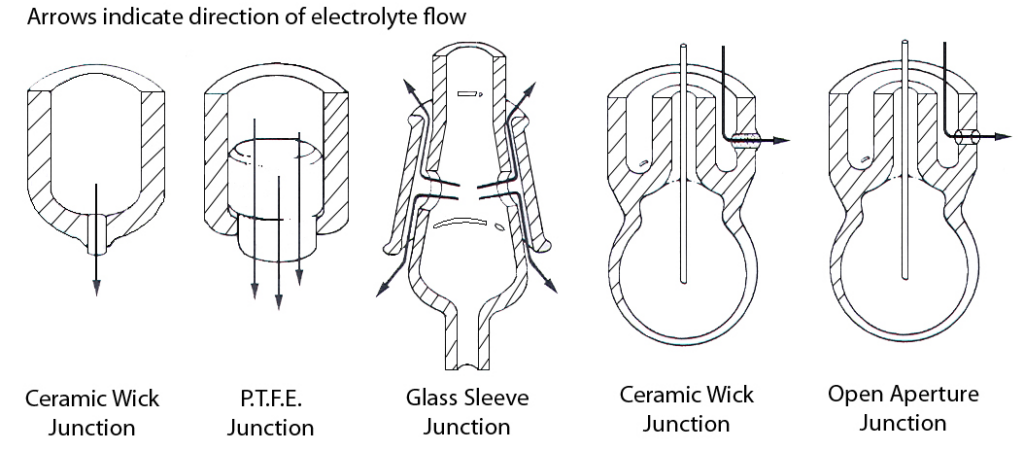
Though the most common type of liquid junction is formed by a porous pin, depending on the application, other types may be applicable. Annular ceramic junctions, sleeve junctions, and open liquid junctions are all acceptable alternatives to the porous pin junction, keeping in mind that they all exhibit a higher outflow of internal filling solution. This is very beneficial when measuring in solutions of very high or very low ionic strength. Certain buffers, biological buffers, for example, and viscous solutions require these types of liquid junctions.
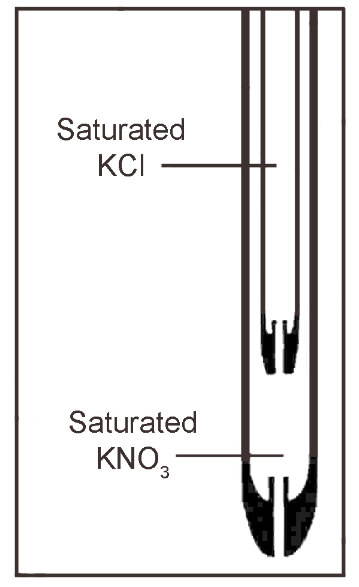
Figure 7 shows various different liquid junctions types. The typical directional flow of KCl internal filling solution for each is shown.
The internal filling solution should not contain KCl for the following reasons:
- It will interfere with the measuring solution.
- If there is a chance that the liquid junction will clog due to precipitation
- Also, if it is immiscible with the sample
A double junction electrode with a second internal junction not containing KCl, or a modified internal filling solution can serve. An electrode utilizing mercurous sulfate and potassium sulfate is one example. Several other combinations are on Table 4.
| Type of Reference Electrode | Salt-bridge Solution(s) | Potential vs. Standard H2 Electrode | Potential vs. Sat. Calomel Electrode |
|---|---|---|---|
| Hg/Hg2Cl2 | sat. KCl | 244 mV | 0 mV |
| Ag/AgCl | sat. KCl | 200 mV | -44 mV |
| Hg/Hg2SO4 | sat. K2SO4 | 640 mV | 408 mV |
| Calomel | sat. LiCl | ~200 mV | ~ -45 mV |
| Hg/Hg2Cl2 | sat. KCl/KNO3 | 244 mV | ~ 0 mV |
Combination Electrodes
Single stem electrodes, that is, combination electrodes are popular by virtue of their convenience. The indicating electrode and the reference electrode are simply built into the same physical entity. This construction ensures that the two electrodes are at the same temperature during operation.
Combination electrodes with symmetrical electrode chains, that is, identical internal references, are the optimal construction for obtaining temperature equality in the two electrodes. The inner electrode of the glass electrode ( Ag/AgCl ) is the same type and has the same dimensions as the reference electrode and the internal filling solutions are as identical as possible ( saturated KCl ).
Which is the correct electrode?
The sample size and the sample vessel dictate the correct physical dimensions of the electrode. Electrodes with epoxy bodies and protective cap in place should serve for harsh environment conditions. An electrode with a flat membrane should serve for measurements performed directly on flat surfaces. In short, there is literally an electrode design for almost every possible measuring situation.
High temperature measurements limit your choice of electrodes since only certain electrochemical systems can withstand high temperatures. Calomel electrodes will not withstand temperatures above 60° C, as decomposition of the calomel paste will occur. Certain Ag/AgCl reference electrodes, however, may be used instead. The composition of the electrode also restricts the temperature range in some cases. Low temperature measurements requires longer response time for an accurate measurement. Longer response times may also be the result of small or thick membranes, and in glass formulations especially suited for measurements in solutions exhibiting alkaline error.
High pH and high salt concentrations require electrodes with alkali-resistant glass membranes. An electrode with standard glass composition should serve in all other cases. Because the alkali-resistant glass is more fragile than standard glass.
Emulsions or fatty solutions require the correct type of liquid junction, which is one that is easy to renew and clean. For example, an open liquid junction or sleeve junction electrode. Though these types of liquid junctions are sometimes suitable for measurements in non-aqueous solutions, electrodes containing electrode filling solutions with lithium chloride are also suitable since LiCl is soluble in many organic media while KCl has a very limited solubility.
If chloride interference or contamination is a problem, using a reference electrode with a chloride free reference system is necessary, that is, an electrode containing Hg/Hg2SO4 with K2SO4 filling solution, or a reference electrode with a double salt bridge.
Pure water pH measurements or other solutions exhibiting low ionic strength may pose measurement problems. An electrode with a fairly high outflow of KCl is necessary to minimize the liquid junction potential, though contamination of the measuring solution will occur more quickly than with other types of liquid junctions. Annular ceramic junction and sleeve junction electrodes will help minimize the outflow of the electrode filling solution, though their junction potentials are less stable.
To ensure that K+ and Cl– ions still dominate the ionic transport in the junction a solution high in ionic strength and some buffer solutions requires a high outflow. Open liquid junctions and sleeve junctions are advisable for this type of measuring environment. An open liquid junction with a controlled and small outflow can be used for high precision measurements.
Maintaining the electrode
Maintaining the electrode on a regular basis ensures:
- A faster response.
- More reliable measurements.
- As well as a longer lifetime.
Since the glass electrode and the reference electrode are maintained differently, they will be described separately. A combination electrode is a blend of maintenance procedures from both the glass electrode and the reference electrode instructions.
Several electrode suppliers have maintenance kits containing all necessary items for maintaining glass, reference, and combined electrodes.
Glass Electrode Care
The entire glass membrane must always be clean. Rinsing the membrane with distilled water will often suffice for aqueous solutions. Rinsing the electrode with a mild detergent solution once a week will be beneficial. An alkaline hypochlorite solution can serve in cleaning electrode membranes subjected to solutions containing fat or proteins.
Between measurements, store the glass electrode in a pH buffer with pH < 7. High temperature measurements, compounded by constant use in strong alkaline solutions or weak solutions of hydrofluoric acid will drastically reduce the lifetime of the electrode, since the glass membrane will slowly dissolve.
Dry storage is advisable if the electrode will not be in use for two weeks or more. Before use, the electrode should be soaked well.
Trapped air bubbles around the inner reference electrode will produce an unstable reading. Swing the electrode in an arc or tap it gently to remove the bubbles. It may be necessary to heat the electrode gently to approximately 60° C in a water bath to release air bubbles from KCl crystals.
In order to establish a stable, hydrated glass membrane, new or dry-stored electrodes should be soaked overnight in 0.1 M HCl. After overnight soaking, rinsing, soaking in a buffer of pH = 4, and again rinsing, the electrode should be ready for use. If a shorter soaking time is necessary, then calibration of the electrode should be frequent to adjust for drifting potentials.
If a glass electrode retains a sluggish response after performing proper maintenance, there may be need for a slight etching of the outer glass layer of the membrane. The following treatment is only recommended after all other measures have been used to improve response and have failed. Soak the glass membrane portion of the glass electrode in a 20% ammonium bifluoride solution for one minute, followed by 15 seconds in 6 M hydrochloric acid. Since the formation of hydrofluoric acid is possible during this procedure, be careful if choosing this method of electrode rejuvenation. Rinse the electrode well and soak for 24 hours in a pH buffer with pH < 7.
The proper functioning of the glass electrode depends on the hydration of the glass layer that takes place on the surface of the pH sensitive glass membrane during soaking and measurement in aqueous solutions. With frequent rehydration of the electrode, accurate measurements in non-aqueous or partly aqueous solutions are also possible. Accomplishing this can be by soaking in a slightly acidic buffer. In non-aqueous solvents completely immiscible with water and before soaking, the electrode should first be rinsed with a solvent which is miscible with both water and the solvent before rinsing with water.
The electrode cable and the electrode plug must be clean and dry. This is necessary for obtaining reliable measurements because of the very small electrode currents which pass through the glass electrode.
A number of factors dictate the useful lifetime of the glass electrode membrane and is highly individualistic. High temperatures, frequent measurements in alkaline solutions, repeated etchings, and improper maintenance will reduce the electrode’s lifetime, whereas proper maintenance will prolong the useful lifetime. The glass membrane will, however, deteriorate gradually even when stored dry. A standard glass electrode, whether a monoprobe or a combination electrode, will usually last for 12 – 18 months.
Reference Electrode Care
The reference electrode must be clean at all times. Because, most electrode problems are often from the reference electrode. Cleaning and rinse solutions are the same as for the glass electrode.
The electrode must always be filled with the salt bridge solution. Most electrodes use saturated potassium chloride, KCl. The presence of KCl crystals in the salt bridge assures saturation.
In certain cases, the salt bridge solution may be different than saturated KCl, depending on the special nature of the reference electrode, i.e., the need for a chloride free solution or for non-aqueous solutions. In these instances, potassium sulfate or lithium chloride solutions can serve, respectively. When reference electrodes with a double salt bridge are in use, saturated potassium chloride is normally in the inner salt bridge. While the outer salt bridge contains a suitable salt of high concentration, such as KNO3, NH4NO3, or Li-Acetate.
Storing of the reference electrode is preferably in a small beaker containing the salt bridge solution for short term storage. For long term storage, rinse the electrode, dry, and store with the end cap on and the rubber band covering the filling hole in place.
The solution in the salt bridge should always be on a higher level than the solution to be measured. Because infiltration of the sample solution may occur in the salt bridge, so, the direction of flow should always be from the salt bridge into the sample solution. If this is not always achievable, then monthly changing of the salt bridge solution should be the norm.
Annular ceramic junctions and porous pin junctions can occasionally become blocked due to crystallization of the salt bridge filling solution. Soaking in the salt bridge solution usually remedies the situation, but, on those instance that it doesn’t, raising the temperature to the maximum allowable for the reference system will often help. A precipitate of silver chloride or sulfide may clog the porous pin. The gentle use of an abrasive paper, e.g., emery cloth, will remove most blockages. Soaking the porous pin for a few hours in acidic solution of thiourea ( 1 M thiourea in 0.1 M HCl ) will usually do what the abrasive paper sometimes fails to do, that is, chemically clean the blockage.
Trapped air bubbles can also cause malfunctions. Removal of these bubbles can be by gently tapping the electrode or shaking it downward as one would a clinical thermometer.
The useful lifetime of a reference electrode depends on the maintenance and care given the electrode. It is important that the electrode does not dry out, the junction remains clean, and the salt bridge should always be at the level in line with the manufacturer specifications. With proper maintenance, the lifetime for a reference electrode is indefinite, but usually greater than two years.
Providing good maintenance care to the electrodes facilitates easy performance of proper calibration. If the problem persists, then it is necessary to examine the electrodes again or replace them.
When performing a calibration with two buffers, stability should occur within approximately one minute in each case. Document the zero point and sensitivity after each calibration since a large deviation from one calibration to the next indicates a problem.
The pH meter
The function of the pH meter is to measure the potential difference ( in mV ) between the electrodes and convert it to a pH display.
In the figure below, we see the construction of a pH meter in a simplified diagram.
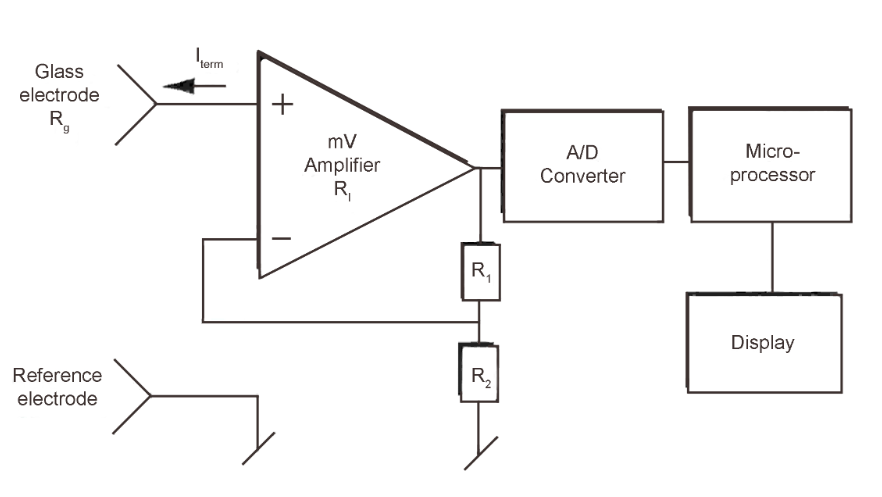
The input amplifier and the converting circuit must meet certain requirements in order to obtain a correct measurement. A potential difference between the glass electrode and the reference electrode is amplified in the mV amplifier before the A/D converter feeds the signal to the microprocessor for result calculation.
The amplifier’s input resistance, R1, must be considerably higher than the inner resistance of the typical glass electrode, that is, higher than 108 Ohms. It is also important that the amplifier does not send any current through the glass electrode as this will give an error potential and could even damage the electrode. The bias current or so-called terminal current, Iterm, should therefore be below 10-12 A.
When R1 > Rg, Iterm = 10-12 A and Rg = 108 Ohms, the error introduced can be calculated according to Ohm’s Law:
![\[ V_{error}=10^{-12}A\, \cdot 10^{8}Ohms=10^{-4}V=0.1mV \]](https://alpha-measure.com/wp-content/ql-cache/quicklatex.com-7d1343bd0d1edb3d5fcb12810df5b27f_l3.png "Rendered by QuickLaTeX.com")
The amplifier and other circuits must have a small temperature coefficient, i.e., the influence of temperature variations must be under control, to attain reliable and consistent results.
The result is displayed in numeric form normally ( digital display ), though a few pH meters with analogue display are still available.
For an analogue pH meter, the zero pH and sensitivity adjustment is entails using adjustable resistances ( knobs ) and the amplification factor is under direct manual control. The signal is then sent through an A/D converter. The output is a digital signal for the numeric display.
For a digital pH meter, the amplifier works under the same conditions all the time and has a direct connection to an A/D converter. A microprocessor based circuit then translates the converter’s output and the calculated pH is displayed. A temperature sensor provides both temperature display and a temperature correction. For some microprocessor systems, automatic recognition of calibration buffers and even automatic stability control of the electrode signal is possible.
To avoid interference, take the following into consideration:
- To alleviate problems related to noisy electrode signals, proper grounding of all types of pH meters is essential.
- The connection of all of the instruments should be to the same point if the pH meter is part of a larger measuring system.
- A separate grounding lead must connect to the circuit if the wall power outlet does not include proper grounding.
- Avoid running the electrode cables parallel to power lines as they may pick up noise.
Buffer solutions
Calibration is a requirement to align the electrodes to the pH meter. An ideal solution to use for this purpose is one with a verifiable pH with buffering capacity. Buffering capacity is the ability of the solution to absorb slight additions of acid or alkaline species and still maintain a precisely known pH value.
Pure and stable chemicals are ideal for buffer solutions. The pH values should be well defined and the liquid junction potential should be the same size as the one for the unknown sample solutions. There are two kinds of buffer solutions: technical buffers with a high buffer capacity and IUPAC / NIST buffers with a lower buffer capacity. The production of IUPAC/NIST buffers is in accordance with the true definition of pH, that is, by using the hydrogen electrode measuring setup, assuring utmost accuracy. The liquid junction potential for these buffers presents no problem in normal, diluted sample solutions.
Over the years, there has been an evolution of the buffers in use today with many of them originally from the Danish chemist, S.P.L. Sorensen. R.G. Bates, a former employee of the National Bureau of Standards, has researched a number of buffers and his work forms the basis of the current series of IUPAC / NIST buffers.
The buffers’ temperature dependency can be expressed using the formula
![\[ pH=\frac{A}{T}+B+\left ( C\cdot T \right )+\left ( D\cdot T^{2} \right ) \]](https://alpha-measure.com/wp-content/ql-cache/quicklatex.com-9b2755439c0aee75b2902906fb659b0f_l3.png "Rendered by QuickLaTeX.com")
where T is the temperature on the Absolute temperature scale. The coefficients A, B, C, and D are listed for each buffer.
Buffers with high precision have only a limited lifetime, a limited stability. So, the precision of the measurements governs how short their period of usage should be. Though alkaline buffers pose the greatest problem because of their tendency to absorb carbon dioxide from the air, a buffer solution in an opened and capped bottle, will last for a limited period of time. Even unopened buffers in thin, plastic bottles have a tendency to absorb CO2 from the atmosphere. Thick plastic bottles, sealed in cans under a nitrogen atmosphere, have the greatest advantage for maintaining optimal solutions.
High quality buffers contain a small amount of germicide to prevent microbiological growth, since many of the buffers are excellent culture media. Buffers with other additives, including many colored dyes, could disturb the pH value or the stability of the solution. They may have an adverse effect on the liquid junction.
Calibration of pH Meter
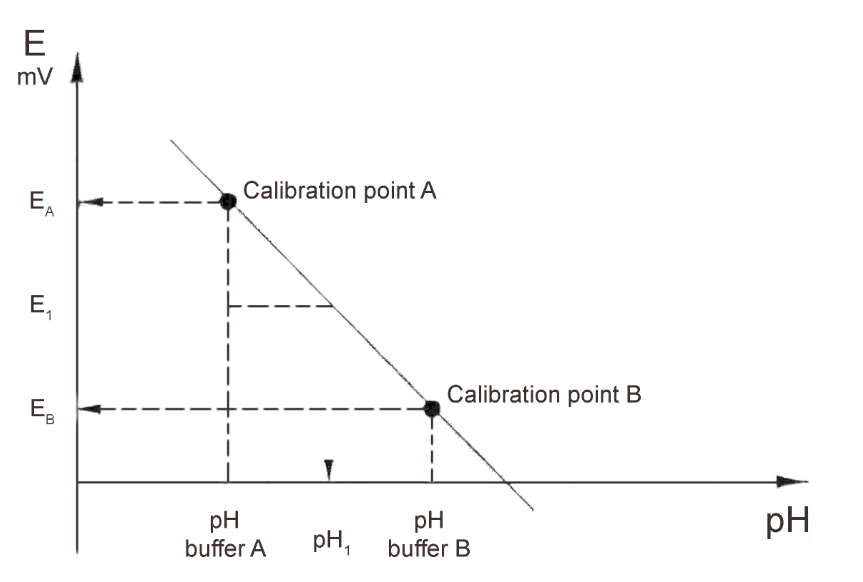
Electrodes have slightly different characteristics. Different manufacturers produce electrodes with varying nominal values. The zero pH and the sensitivity will vary with time. Calibration matches the pH meter to the characteristics of the electrodes in use and continued calibration of the electrode on a regular basis corrects for continually changing characteristics during the lifetime of the electrodes. Using two different buffer solutions enables the performance of the most accurate calibration. This enables the determining of both pH° (zero pH) and the slope (sensitivity).
It is possible to carry out a one-point calibration with only one buffer if the last calibration is recent or if you are in a hurry. Only the pH° will be determined and the sensitivity previously found will be used.
The indication of the sensitivity is usually as a percentage of the theoretical value and it is independent of temperature. The slope, when expressed as mV/pH, is directly dependent on temperature. The slope (at 25°C) often serves as an alternative to sensitivity in % ( 100% = 59 mV/pH ).
Zero pH ( pH° ) is generally used to describe electrode characteristics, though the potential at pH 0 or pH 7 at 25° C can also be given.
When performing a calibration, follow a consistent pattern. Use the same stirring speed, the same stability criteria, and the same waiting time. The buffers should be at the same temperature, preferably the temperature of the sample. For the most accurate measurements, the two buffers should bracket the value of the sample solution, that is, for samples between pH 4.0 and 7.0, use of the pH = 4.01 and pH = 7.00 buffers would be advisable. However, it is possible to measure sample pH values close to, but outside this range, using these buffers.
Though there are many varieties of pH meters on the market, for example, those with knobs and dials for adjustment, the simplest and most convenient meters have an autocalibration, that is, buffer recognition, facility. These meters have a full range of buffer values, with corresponding temperature variations, preprogrammed in their memories. Based on definitive buffer recognition, the operator must be sure to use only the preprogrammed buffers, lest the meter be fooled into accepting a false buffer value. For instance, a pH 6.86 instead of a pH 7.00 buffer.
Temperature effects on pH
Temperature influences sample and buffer pH, as well as electrode characteristics. Moreover, temperature dependency for all common buffers is known and is usually stated on the buffer bottle. Or, on a separate form sent with the buffers from reputable manufacturers. Temperature has a minimal effect on inorganic acid buffers. It has a significant effect, however, on alkaline buffers and on some organic buffers. It is possible to compensate for the influence of temperature on the slope of the electrodes. Though it is not possible to do same for pH shifts caused by altered reference potentials or a change of the pH in the inner solution in the glass bulb. In addition, almost nothing is known about the influence of temperature on a sample’s pH. The temperature of the sample should be recorded along with the pH of the sample.
In summary, electrodes, buffers, and samples should all be at the same temperature. Though some compensation is possible, it is not possible to calculate the pH of a sample measured at one temperature back to the sample pH at another temperature, for example, a reference temperature. A temperature difference, however, of 2 – 5° C will be acceptable in most cases.
When plotting pH vs. mV at a number of different temperatures for most electrodes, note that the lines intersect at almost the same point.

The intersection points do not coincide for isotherms at great variations in temperature.
This point is the iso-pH or iso potential point. If the pH° and the iso-pH coincide, either by electrical circuitry or calculation, then it is necessary to compensate for the electrode’s temperature dependence. Also, measurements in a fairly large temperature range will be possible. When sample measurement and calibration is at two distinct temperatures, it is easier to control errors. If the electrodes used have the same electrochemical system as, say, for instance, a glass electrode with Ag/AgCl internal reference and a reference electrode with Ag/AgCl internal reference or a combination electrode, the temperature range allowed is larger than it would be with an unlike electrochemical construction.
The iso-pH calibration entails using two buffers at the same temperature and one of the two original buffers ( usually the first used ) at an elevated or depressed temperature at least 20° C less than or greater than the original temperature. This allows for essentially a three buffer calibration, Buffers A & B at one temperature and Buffer A at a higher or lower temperature than before.
After determining pH°, sensitivity, and iso-pH, the following equation can serve in calculating the pH:
![\[ pH_{T}=\left [ pH^{\circ}\cdot\left ( \frac{T_{cal}}{T} \right ) \right ]-\frac{E}{\left ( R{}' \cdot S\cdot T\right )}+\left [ pH_{iso}\cdot \left ( 1-\frac{T_{cal}}{T} \right ) \right ] \]](https://alpha-measure.com/wp-content/ql-cache/quicklatex.com-81fe1fc4c51366ca55786b3abf1b7752_l3.png "Rendered by QuickLaTeX.com")
Troubleshooting Guide
The goal of troubleshooting is the isolation of a problem through checking each of the system components in turn: the meter, the glassware, the electrode, the standards, the sample, and the technique.
Meter
Check the meter by following the checkout procedure in the instrument instruction manual.
Glassware
Clean glassware is essential for good measurement. Thus, be sure to wash the glassware well with a mild detergent and rinse very well with distilled or deionized water. Clean glassware will drain without leaving water droplets behind.
Electrodes
Check the electrodes by using the procedure found in the section entitled Calibration.
1. Be sure to use distilled or deionized water when following the procedures given in the Calibration section.
2. If the electrode fails to respond as expected, see the section entitled Maintaining the Electrode. Repeat the calibration.
3. If the electrode still fails to respond, then substitute it with another electrode that is in good working condition. But, if the problem persists and you are using an electrode pair, try the same routine with a working reference electrode.
4. If the problem persists, then standards may be of poor quality. So, open fresh standards and attempt to calibrate the electrode again.
5. In a situation where another electrode is not available for test purposes, or if the electrode in use is suspect, review the calibration procedure and be sure to:
- Clean and rinse the electrode thoroughly.
- Prepare the electrode properly.
- Use the proper filling solution.
- Review Troubleshooting Hints.
Standards
Be sure to check the standard solutions whenever problems arise with the measuring procedure that was previously successful. If in doubt about the credibility of any of the standards, open fresh standards.
Sample
Look for possible contaminants if the electrode works perfectly in the standard, but not in the sample.
Try to determine the composition of the samples prior to testing to eliminate a problem before it starts.
Technique
Be sure that you do not exceed the electrode’s limit of detection.
Also, be sure that you clearly understand the calibration procedure and you follow Good Laboratory Practice.
Troubleshooting Hints
| Symptom | Possible Causes | Next Step |
|---|---|---|
| Out of range reading | Defective meter | Check meter with shorting strap (see meter instruction manual) |
| Defective electrode | Check electrode operation | |
| Electrode(s) not plugged in properly | Unplug electrode(s) and reseat | |
| Reference electrode not filled | Be sure reference electrode is filled | |
| Air bubble on membrane | Remove bubble by redipping electrode | |
| Calibration control not turned far enough | Continue turning the calibration control | |
| Noisy or unstable readings (readings continuously or rapidly changing) | Defective meter | Check meter with shorting strap |
| Air bubble on membrane | Remove bubble by re-dipping electrode | |
| Wrong reference electrode | Use the recommended reference electrode | |
| Meter or stirrer not grounded | Ground meter or stirrer | |
| Drift (reading slowly changing in one direction) | Samples and standards at different temperatures | Allow solutions to come to room temperature before measurement |
| Incorrect reference filling solution | Use recommended filling solution | |
| Low slope or no slope | Standards contaminated or incorrectly made | Use fresh standards |